The article was credited to: Bianca Ffolkes | Yahoo Lifestyle – Thu, Sep 27, 2012 13:16 BST and is reproduced in part below.
Sunday 30 September 2012
A real, live case!
Promptly in keeping with the subject of the moral & artistic considerations for extreme editing of images, this story appeared on Yahoo News on Thursday the 27th of September 2012. I have shown this article in part. Interesting to see that the decision to edit the photograph in this fashion does not appear to have been the photographer's on this occasion. This adds another dimension to our subject - should you edit other peoples work?
The article was credited to: Bianca Ffolkes | Yahoo Lifestyle – Thu, Sep 27, 2012 13:16 BST and is reproduced in part below.
The article was credited to: Bianca Ffolkes | Yahoo Lifestyle – Thu, Sep 27, 2012 13:16 BST and is reproduced in part below.

Tuesday 25 September 2012
Enhancement
Furthering the investigation into my personal view on altering
images and at which point an innocent edit becomes more than just that, I have
made two more edits.
This is the first time that I felt the edits were starting to go beyond what was actually recorded on the camera. This was then taken way over my personal limit by changing the colour with the ‘tint’ settings, even though the colour still looks natural.
The adjustments I have made to the two images are localised
to the face and eyes only. For this I have used the Adobe Lightroom software
package. One of the tools available is a paintbrush tool which allows an area
to be ‘painted’. This area can then be adjusted with whatever settings you wish
to apply. To soften the transition between the effect and the unaltered image,
an adjustable feathered edge can be applied.
For the first image I have set the brush to adjust exposure
with a soft edge and then painted over the girls face, stopping at the
hairline. I then lifted the exposure to lighten the face. In doing this I have
tried to keep the image looking natural.
For this image I am happy that it still reproduces the girl
faithfully. She did after all look like this and had the light been in a
slightly different place, her face may have been lit the same way.
The second image has built on the first by having the eyes enhanced
further. The the eyes have then been given another colour. This was again done
with the localised brush tool but I reduced the feathering to work on the
smaller area of the pupils. First steps were to increase exposure and contrast.
 |
| Image with the face brightened. |
 |
| Image with face brightened and eyes coloured. |
Sunday 23 September 2012
Tate Modern
Following on from some of the previous exercises, I have converted one of my older film images to black & white. I chose this shot of a new exhibit going up in the Tate Modern, as it has a bit of tonal range.
Similar to an earlier exercise I had to do a bit of dust spot removal. In several instances this did mean having to choose between dust spots and real marks on the floor.

Similar to an earlier exercise I had to do a bit of dust spot removal. In several instances this did mean having to choose between dust spots and real marks on the floor.
Wednesday 19 September 2012
Improvement or interpretation?
The following image has undergone some processing similar to traditional dodging and burning. I have isolated the figure and pallet using the polygonal lasso tool and feathered the edge of the selection by a few pixels in an attempt to soften the edge of the cut-out. Then I have worked with a levels adjustment layer, the objective being to lightening the figure.
I have tried to lighten the figure without the end result looking 'false'. I think this has worked very well.
The exercise is again asking me to consider the limits of this image manipulation. I find the level of work carried out here quite acceptable. Even if I had lightened the figure more, I don't feel it is telling an 'un-truth' although the image will look false. My reasoning for this is that the image is still displayed as it was seen albeit a little lighter.
This is of course all highly subjective. Other photographers my have different opinions. My own opinions differ depending on the final use of the image.
I have tried to lighten the figure without the end result looking 'false'. I think this has worked very well.
 |
| Portrait with selection altered with levels. |
The exercise is again asking me to consider the limits of this image manipulation. I find the level of work carried out here quite acceptable. Even if I had lightened the figure more, I don't feel it is telling an 'un-truth' although the image will look false. My reasoning for this is that the image is still displayed as it was seen albeit a little lighter.
This is of course all highly subjective. Other photographers my have different opinions. My own opinions differ depending on the final use of the image.
Monday 17 September 2012
Cecil Beaton Exhibition
In a previous post I looked at the work of Cecil Beaton. I have just found out that the Imperial War Museum is hosting an exhibition entitled "Cecil Beaton: Theatre of War" which runs from the 6th September 2012 until the 1st January 2013. (link)
I will be making every effort to visit this exhibition!
I will be making every effort to visit this exhibition!
Monday 10 September 2012
Correction
This chapter encourages us to explore the boundaries of what constitutes 'fake' and 'real'.
With modern technology we have complete control over the image that is presented, much more so than with traditional photography. With skill and practice it is possible to create completely fictitious photographic situations. By some this is considered art, others may see it as fraud. To better understand my own feelings on this subject and to find where I myself draw the line between tidying up a picture and distorting the truth, I am editing the following two images from the course web site. The two images provide two different editing situations.
In the first image I am going to clean up dirt spots. As most of the image consists of similar dust marks, I have shown a section of the image at 100%.
My own feelings about this first exercise are feelings of frustration! The photographed objects appear to be of some kind of transparent substance, i.e. glass or resin. The objects have dark marks all over them but it is not clear if these are dust spots or some property of the materials. As I did not photograph the objects and have never seen the real thing, I am finding it very difficult to be sure that some of the dust spots I am correcting are actually dust spots! It can be argued that somebody looking at the end results would have been unaware of the original marks but then they are falling prey to my version of what was in front of the lens.
For the second part of this exercise I have to remove some lens flare, seen on the left hand side of the image below. I have used the clone tool in Photoshop, set to colour to remove as much of the flare as possible.
This was very difficult to carry out as there is not always a clean area to clone from. As before, it is not always possible to see what the underlying colour and texture should be. I spent quite a lot of time doing this and still believe it was not long enough and could have been done better.
What are my thoughts about this though? Well this was slightly easier to work on than the previous shot as it was easier to relate to what is being shown. Removing the flare in this instance has made for a more enjoyable picture. A big part of me still thinks it would have been better to get the shot without the flare, after all, had I made a better job of the cloning would only prove that I am good at Photoshop, not necessarily photography!
With modern technology we have complete control over the image that is presented, much more so than with traditional photography. With skill and practice it is possible to create completely fictitious photographic situations. By some this is considered art, others may see it as fraud. To better understand my own feelings on this subject and to find where I myself draw the line between tidying up a picture and distorting the truth, I am editing the following two images from the course web site. The two images provide two different editing situations.
In the first image I am going to clean up dirt spots. As most of the image consists of similar dust marks, I have shown a section of the image at 100%.
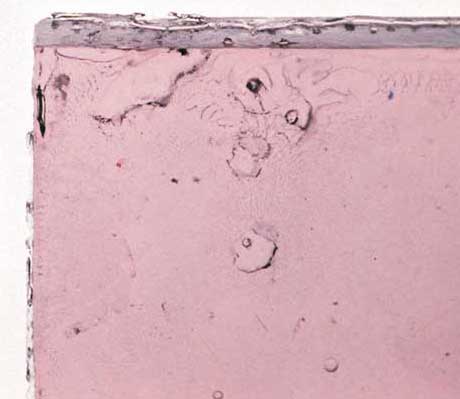 |
| Before clean up with dust spots in place. |
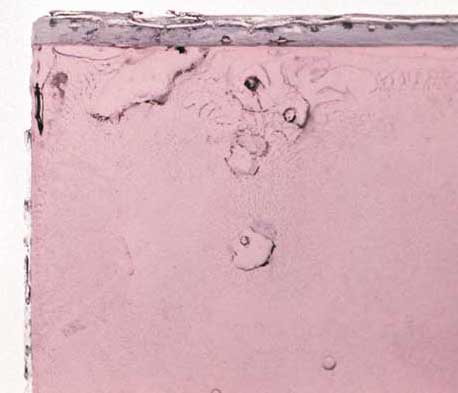 |
| Without dust spots. |
For the second part of this exercise I have to remove some lens flare, seen on the left hand side of the image below. I have used the clone tool in Photoshop, set to colour to remove as much of the flare as possible.
 |
| The original image with flare visible on the left. |
 |
| Lens flare removed with clone tool set to colour. |
Subscribe to:
Posts (Atom)